In this tutorial, we learn what is FileSavePicker and how to use it in order to save image and text file.
FileSavePicker allows users to specify the name and location of where they want to save your app's content.
First will see how to save an text file.
In this sample,we take one button that is used to open the FileSavePicker and a textblock to show the status message.
XAML Code:
In order to use FileSavePicker we have to use following namespaces, add those to Mainpage.xaml.cs
using Windows.Storage.Pickers;using Windows.Storage;
Following is the code for FileSavePicker, write the code in Button click event,
FileSavePicker picker = new FileSavePicker();
picker.SuggestedStartLocation = PickerLocationId.DocumentsLibrary;
picker.FileTypeChoices.Add("Plane Text", new List<string>() { ".txt" });
picker.DefaultFileExtension = ".docx";
picker.SuggestedFileName = "New Document";
StorageFile file = await picker.PickSaveFileAsync();
if (null != file)
{
// Application now has read/write access to the saved file
await Windows.Storage.FileIO.WriteTextAsync(file, text1.Text);
MessageDialog msg = new MessageDialog("File Saved Successfully");
await msg.ShowAsync();
}
else
{
MessageDialog msg = new MessageDialog("File Was Not Returned");
await msg.ShowAsync();
}
In the above code,

It opens a FileSavePicker,
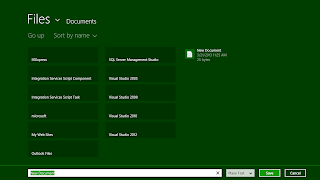
Give the file name and choose the location of where you want to save your file. Then, click the save button to save the file.

You get the message of saving the file successfully. Go to the location and see the file. This is how FileSavePicker is used.
Hope this is useful.
Thank You.
FileSavePicker allows users to specify the name and location of where they want to save your app's content.
First will see how to save an text file.
In this sample,we take one button that is used to open the FileSavePicker and a textblock to show the status message.
XAML Code:
<Page
x:Class="SampleFileSavePicker.MainPage"
xmlns="http://schemas.microsoft.com/winfx/2006/xaml/presentation"
xmlns:x="http://schemas.microsoft.com/winfx/2006/xaml"
xmlns:local="using:SampleFileSavePicker"
xmlns:d="http://schemas.microsoft.com/expression/blend/2008"
xmlns:mc="http://schemas.openxmlformats.org/markup-compatibility/2006"
mc:Ignorable="d">
<Grid Background="{StaticResource ApplicationPageBackgroundThemeBrush}">
<TextBox x:Name="text1" HorizontalAlignment="Left" TextWrapping="Wrap" Text="" VerticalAlignment="Top" Margin="157,39,0,0" Width="622" Height="80"/>
<Button Content="Save" HorizontalAlignment="Left" VerticalAlignment="Top" Margin="415,179,0,0" Click="Button_Click_1"/>
</Grid>
</Page>
In order to use FileSavePicker we have to use following namespaces, add those to Mainpage.xaml.cs
using Windows.Storage.Pickers;using Windows.Storage;
Following is the code for FileSavePicker, write the code in Button click event,
FileSavePicker picker = new FileSavePicker();
picker.SuggestedStartLocation = PickerLocationId.DocumentsLibrary;
picker.FileTypeChoices.Add("Plane Text", new List<string>() { ".txt" });
picker.DefaultFileExtension = ".docx";
picker.SuggestedFileName = "New Document";
StorageFile file = await picker.PickSaveFileAsync();
if (null != file)
{
// Application now has read/write access to the saved file
await Windows.Storage.FileIO.WriteTextAsync(file, text1.Text);
MessageDialog msg = new MessageDialog("File Saved Successfully");
await msg.ShowAsync();
}
else
{
MessageDialog msg = new MessageDialog("File Was Not Returned");
await msg.ShowAsync();
}
- Created an object of FileSavePicker
- Suggested start location
- Added file types the user can save the file as
- Mentioned default extension if the user does not select a choice explicitly from the dropdown
- Suggested file name if the user does not type one in or select a file to replace
- Getting the text whatever typed in textbox and saving it to file.

It opens a FileSavePicker,

Give the file name and choose the location of where you want to save your file. Then, click the save button to save the file.

You get the message of saving the file successfully. Go to the location and see the file. This is how FileSavePicker is used.
Hope this is useful.
Thank You.