In this tutorial I will explain how to use Bing Map for Windows Store Application.Here I will explain how to display your location on a Bing Map and then test your app with a
variety of locations using the Simulator included in Microsoft Visual
Studio 2012.
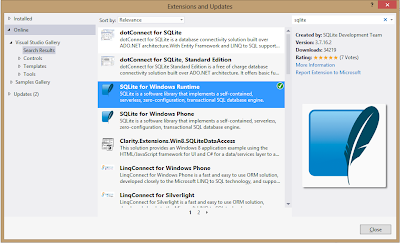
Step 1 : Download and install Bing Map SDK for Windows Store App. In Visual Studio 2012, go to Tools|Extensions and Updates. Click on online and write Bing Map SDK in search box. Install Bing Map SDK for Windows Store.
Step 2 : Register and create Bing Map Keys for your application. Register as a user on the Bing Maps Portal and then follow the instructions for Getting a Bing Maps Key for your app. Later, we'll use the key that is generated when we insert the Bing Maps control into our project.
Step 3: Open of Visual Studio 2012.
Step 4: Create a new project
Create a new project, choosing a Blank App (XAML) from the Visual C# > Windows Store project types. Name your app SimpleMapping.
Step 5: Set your target platform. Open the Configuration Manager from the Build menu and set your Active solution platform to x86 or x64.
Step 6: Add the Bing Maps references. In the Solution Explorer, right-click References and add references to Bing Maps for C#, C++, or Visual Basic and Microsoft Visual C++ Runtime Package.
Step 7: Set the Location capability. Open the Package.appxmanifest file and go to the Capabilities tab. Select the Location capability.
Step 8: Add classes for the 10-meter and 100-meter location icons
- In the Solution Explorer, right-click the SimpleMapping project and add a New Item. Select User Control and name the page LocationIcon10m.xaml.
- Open LocationIcon10m.xaml and copy the following XML into it
(replacing the original contents of the file). This code provides an
icon to display when the location data is accurate down to about 10
meter.
<UserControl x:Class="SimpleMapping.LocationIcon10m" xmlns="http://schemas.microsoft.com/winfx/2006/xaml/presentation" xmlns:x="http://schemas.microsoft.com/winfx/2006/xaml" xmlns:local="using:SimpleMapping" xmlns:d="http://schemas.microsoft.com/expression/blend/2008" xmlns:mc="http://schemas.openxmlformats.org/markup-compatibility/2006" mc:Ignorable="d"> <Canvas> <Ellipse Height="25" Width="25" Fill="#FFF0F0F0" Margin="-12.5,-12.5,0,0"></Ellipse> <Ellipse Height="20" Width="20" Fill="Black" Margin="-10,-10,0,0"></Ellipse> <Ellipse Height="10" Width="10" Fill="White" Margin="-5,-5,0,0"></Ellipse> </Canvas> </UserControl> - In the Solution Explorer, right-click the SimpleMapping project and add a New Item. Select User Control and name the page LocationIcon100m.xaml.
- Open LocationIcon100m.xaml and copy the following XML into it (replacing
the original contents of the file). This code provides an icon to
display when the location data is accurate down to about 100 meters.
Note that if we have even less accurate data, we will not display an
icon and will only show a region on the map.
<UserControl
    x:Class="SimpleMapping.LocationIcon100m"
    xmlns="http://schemas.microsoft.com/winfx/2006/xaml/presentation"
    xmlns:x="http://schemas.microsoft.com/winfx/2006/xaml"
    xmlns:local="using:SimpleMapping"
    xmlns:d="http://schemas.microsoft.com/expression/blend/2008"
    xmlns:mc="http://schemas.openxmlformats.org/markup-compatibility/2006"
    mc:Ignorable="d">

    <Canvas>
        <Ellipse Height="55" Width="55" Fill="Black" Opacity=".35" Margin="-27.5,-27.5,0,0"></Ellipse>
        <Ellipse Height="50" Width="50" Fill="CornflowerBlue" Opacity=".65" Margin="-25,-25,0,0"></Ellipse>
        <Ellipse Height="25" Width="25" Fill="#FFF0F0F0" Margin="-12.5,-12.5,0,0"></Ellipse>
        <Ellipse Height="20" Width="20" Fill="Black" Margin="-10,-10,0,0"></Ellipse>
        <Ellipse Height="10" Width="10" Fill="White" Margin="-5,-5,0,0"></Ellipse>
    </Canvas>
</UserControl>
- Open the file MainPage.xaml and copy the following XML into it
(replacing its original contents). This XML will display one button for
retrieving the location, one button to cancel the operation, six text
boxes for displaying the location data and labels, and one map control
for displaying the location.
<Grid><Button x:Name="MapCurrentLoc" Content="Map Current Location" HorizontalAlignment="Left" Margin="29,31,1157,0" VerticalAlignment="Top" Click="MapLocationButton_Click" Height="38"/> <Maps:Map x:Name="Map" Margin="0,120,0,0" Credentials="Insert Your Bing Maps Key Here"/> <Button x:Name="CancelGetLocationButton" Content="Cancel" HorizontalAlignment="Left" Margin="242,31,0,0" VerticalAlignment="Top" Click="CancelGetLocationButton_Click"/> <TextBox x:Name="MessageTextbox" HorizontalAlignment="Left" Margin="354,37,0,0" TextWrapping="Wrap" VerticalAlignment="Top" Width="605" Background="{StaticResource ButtonBackgroundThemeBrush}" Foreground="{StaticResource ButtonForegroundThemeBrush}" BorderBrush="{StaticResource ButtonBackgroundThemeBrush}"/> <TextBox HorizontalAlignment="Left" Margin="1046,10,0,0" TextWrapping="Wrap" Text="Latitude:" VerticalAlignment="Top" Background="{StaticResource ButtonBackgroundThemeBrush}" BorderBrush="{StaticResource ButtonBackgroundThemeBrush}" Foreground="{StaticResource ButtonForegroundThemeBrush}"/> <TextBox HorizontalAlignment="Left" Margin="1046,42,0,0" TextWrapping="Wrap" Text="Longitude:" VerticalAlignment="Top" Background="{StaticResource ButtonBackgroundThemeBrush}" BorderBrush="{StaticResource ButtonBackgroundThemeBrush}" Foreground="{StaticResource ButtonForegroundThemeBrush}"/> <TextBox HorizontalAlignment="Left" Margin="1046,74,0,0" TextWrapping="Wrap" Text="Accuracy:" VerticalAlignment="Top" Background="{StaticResource ButtonBackgroundThemeBrush}" BorderBrush="{StaticResource ButtonBackgroundThemeBrush}" Foreground="{StaticResource ButtonForegroundThemeBrush}"/> <TextBox x:Name="LatitudeTextbox" HorizontalAlignment="Left" Margin="1165,10,0,0" TextWrapping="Wrap" VerticalAlignment="Top" Background="{StaticResource ButtonBackgroundThemeBrush}" BorderBrush="{StaticResource ButtonBackgroundThemeBrush}" Foreground="{StaticResource ButtonForegroundThemeBrush}"/> <TextBox x:Name="LongitudeTextbox" HorizontalAlignment="Left" Margin="1165,42,0,0" TextWrapping="Wrap" VerticalAlignment="Top" Background="{StaticResource ButtonBackgroundThemeBrush}" BorderBrush="{StaticResource ButtonBackgroundThemeBrush}" Foreground="{StaticResource ButtonForegroundThemeBrush}"/> <TextBox x:Name="AccuracyTextbox" HorizontalAlignment="Left" Margin="1165,74,0,0" TextWrapping="Wrap" VerticalAlignment="Top" Background="{StaticResource ButtonBackgroundThemeBrush}" BorderBrush="{StaticResource ButtonBackgroundThemeBrush}" Foreground="{StaticResource ButtonForegroundThemeBrush}"/></Grid>
2. Insert the Bing Maps Key you acquired earlier into the Map control's Credentials attribute.
Step 10 : Add namespaces in your MainPage.xaml.cs file
using Windows.Devices.Geolocation;
using System.Threading;
using System.Threading.Tasks;
using Bing.Maps;
Step 11: Add the member variables in your MainPage.xaml.cs file
public sealed partial class MainPage : Page
{
   // member variables to add
   private Geolocator _geolocator = null;
   private CancellationTokenSource _cts = null;
   LocationIcon10m _locationIcon10m;
   LocationIcon100m _locationIcon100m;
Step 12 : Initialize the member variables
 public MainPage()
 {
     this.InitializeComponent();
     _geolocator = new Geolocator();
     _locationIcon10m = new LocationIcon10m();
     _locationIcon100m = new LocationIcon100m();
 }
Step 13 : Handle the OnNavigatedTo event. In MainPage.xaml.cs, replace the
OnNavigatedTo event handler with this code, which initializes the states of the Get Location and Cancel buttons.protected override void OnNavigatedTo(NavigationEventArgs e)
{
MapCurrentLoc.IsEnabled = true;
CancelGetLocationButton.IsEnabled = false;
}
Step 14 : Handle the MapCurrentLoc_Click event. Write the following in that event,
private async void MapCurrentLoc_Click(object sender, RoutedEventArgs e)
{
// Change the state of our buttons.
MapCurrentLoc.IsEnabled = false;
CancelGetLocationButton.IsEnabled = true;
// Remove any previous location icon.
if (Map.Children.Count > 0)
{
Map.Children.RemoveAt(0);
}
try
{
// Get the cancellation token.
_cts = new CancellationTokenSource();
CancellationToken token = _cts.Token;
MessageTextbox.Text = "Waiting for update...";
// Get the location.
Geoposition pos = await _geolocator.GetGeopositionAsync().AsTask(token);
MessageTextbox.Text = "";
Location location = new Location(pos.Coordinate.Latitude, pos.Coordinate.Longitude);
// Now set the zoom level of the map based on the accuracy of our location data.
// Default to IP level accuracy. We only show the region at this level - No icon is displayed.
double zoomLevel = 13.0f;
// if we have GPS level accuracy
if (pos.Coordinate.Accuracy <= 10)
{
// Add the 10m icon and zoom closer.
Map.Children.Add(_locationIcon10m);
MapLayer.SetPosition(_locationIcon10m, location);
zoomLevel = 15.0f;
}
// Else if we have Wi-Fi level accuracy.
else if (pos.Coordinate.Accuracy <= 100)
{
// Add the 100m icon and zoom a little closer.
Map.Children.Add(_locationIcon100m);
MapLayer.SetPosition(_locationIcon100m, location);
zoomLevel = 14.0f;
}
// Set the map to the given location and zoom level.
Map.SetView(location, zoomLevel);
// Display the location information in the textboxes.
LatitudeTextbox.Text = pos.Coordinate.Latitude.ToString();
LongitudeTextbox.Text = pos.Coordinate.Longitude.ToString();
AccuracyTextbox.Text = pos.Coordinate.Accuracy.ToString();
}
catch (System.UnauthorizedAccessException)
{
MessageTextbox.Text = "Location disabled.";
LatitudeTextbox.Text = "No data";
LongitudeTextbox.Text = "No data";
AccuracyTextbox.Text = "No data";
}
catch (TaskCanceledException)
{
MessageTextbox.Text = "Operation canceled.";
}
finallyep
{
_cts = null;
}
// Reset the buttons.
MapCurrentLoc.IsEnabled = true;
CancelGetLocationButton.IsEnabled = false;
}
The above code performs the following,
- Changes the state of the Get Location and Cancel buttons.
- Removes any previous location icon that may have been used.
- Sets up a cancellation token so that the user can cancel the operation if it is taking too long.
- Asynchronously gets the location.
- Selects a location icon based on the accuracy of the data retrieved.
- Set the map to the location.
- Handles some error conditions.
- Resets the buttons after the location has been retrieved.
Step 15: Handle the CancelGetLocationButton_Click event. Write the following code in that method.
This code cancels the asynchronous call to get the location if the user presses the Cancel button. It also resets the state of the buttons.
private void CancelGetLocationButton_Click(object sender, RoutedEventArgs e)
{
if (_cts != null)
{
_cts.Cancel();
_cts = null;
}
MapCurrentLoc.IsEnabled = true;
CancelGetLocationButton.IsEnabled = false;
}
Step 16: Handle the OnNavigatingFrom event. Write the following code in that event handler.
This code cancels the asynchronous call to get the location if the user leaves the page.
protected override void OnNavigatingFrom(NavigatingCancelEventArgs e)
{
if (_cts != null)
{
_cts.Cancel();
_cts = null;
}
base.OnNavigatingFrom(e);
}
Step 17: Build and run the app.
- The first time you run the sample, a prompt asks whether the app can use your location. Choose the Allow option.
- Click the Get Location button to get the current location.
Step 18: Test the app in the Simulator. To test your app with different locations, change the Target Device in Visual Studio 2012 from Local Machine to Simulator.
This is how Bing map works on Windows Store App.
Thanks.


