Thursday, 21 March 2013

Windows Store App Development Tutorial - Part 12 : FileSavePicker - Saving Image and Text File

In this tutorial, we learn what is FileSavePicker and how to use it in order to save image and text file.

FileSavePicker allows users to specify the name and location of where they want to save your app's content.


First will see how to save an text file.


In this sample,we take one button that is used to open the FileSavePicker and a textblock to show the status message.

XAML Code:

<Page
    x:Class="SampleFileSavePicker.MainPage"
    xmlns="http://schemas.microsoft.com/winfx/2006/xaml/presentation"
    xmlns:x="http://schemas.microsoft.com/winfx/2006/xaml"
    xmlns:local="using:SampleFileSavePicker"
    xmlns:d="http://schemas.microsoft.com/expression/blend/2008"
    xmlns:mc="http://schemas.openxmlformats.org/markup-compatibility/2006"
    mc:Ignorable="d">

    <Grid Background="{StaticResource ApplicationPageBackgroundThemeBrush}">
        <TextBox x:Name="text1" HorizontalAlignment="Left" TextWrapping="Wrap" Text="" VerticalAlignment="Top"   Margin="157,39,0,0" Width="622" Height="80"/>
        <Button Content="Save" HorizontalAlignment="Left" VerticalAlignment="Top" Margin="415,179,0,0" Click="Button_Click_1"/>
    </Grid>
</Page>

In order to use FileSavePicker we have to use following namespaces, add those to Mainpage.xaml.cs

using Windows.Storage.Pickers;using Windows.Storage;

Following is the code for FileSavePicker, write the code in Button click event,

            FileSavePicker picker = new FileSavePicker();
            picker.SuggestedStartLocation = PickerLocationId.DocumentsLibrary;
            picker.FileTypeChoices.Add("Plane Text", new List<string>() { ".txt" });
            picker.DefaultFileExtension = ".docx";
            picker.SuggestedFileName = "New Document";
            StorageFile file = await picker.PickSaveFileAsync();
            if (null != file)
            {

                // Application now has read/write access to the saved file                
                await Windows.Storage.FileIO.WriteTextAsync(file, text1.Text);
                MessageDialog msg = new MessageDialog("File Saved Successfully");
                await msg.ShowAsync();
            }
            else
            {
                MessageDialog msg = new MessageDialog("File Was Not Returned");
                await msg.ShowAsync();
            }

In the above code,
  • Created an object of FileSavePicker
  • Suggested start location
  • Added file types the user can save the file as
  • Mentioned default extension if the user does not select a choice explicitly from the dropdown 
  • Suggested file name if the user does not type one in or select a file to replace
  •  Getting the text whatever typed in textbox and saving it to file.
Now, build the application and Run by using F5. Type something in Textbox and click on Save button


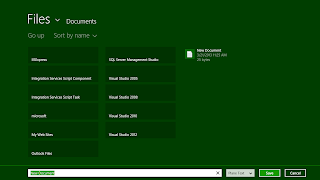
It opens a FileSavePicker, 


Give the file name and choose the location of where you want to save your file. Then, click the save button to save the file.


You get the message of saving the file successfully. Go to the location and see the file. This is how FileSavePicker is used.

Hope this is useful.
Thank You.

Tuesday, 19 March 2013

Windows Store App Development Tutorial - Part 11 : FileOpenPicker

FileOpenPicker is an UI element, used to choose and open files. In order to use FileOpenPicker, we have to add "Windows.Storage.Pickers" namespace.

In this sample, I am taking a Button and Image control in the design page, whenever user clicks on Button, it opens FileOpenPicker to select an image from the collection of images which are from the local drive of computer. When the user selects a particular image, in binds that with Image control which is present in design page.

XAML Design of the page is as follows,

 <Image x:Name="image1" HorizontalAlignment="Left" Height="194" Margin="275,112,0,0" VerticalAlignment="Top" Width="200" Stretch="UniformToFill"/>
 <Button Content="Click" HorizontalAlignment="Left" VerticalAlignment="Top" Click="Button_Click_1"/>


Following code is about how to use FileOpenPicker, write the code in button click event,

            FileOpenPicker picker = new FileOpenPicker();
            picker.SuggestedStartLocation = PickerLocationId.PicturesLibrary;
            picker.ViewMode = PickerViewMode.Thumbnail;
            picker.FileTypeFilter.Add(".jpg");
            picker.FileTypeFilter.Add(".png");
            var file = await picker.PickSingleFileAsync();
            var stream = await file.OpenAsync(Windows.Storage.FileAccessMode.Read);

In the above code, 
  • Created an object of FileopenPicker,
  • Suggested start location
  • Assigned view mode as thumbnails
  • Added two file type filters are .jpg, .png
  • Reading complete stream of selected image
Now, we have to bind selected image to the image control which is in design page. For that we are using BitmapImage class. In order to use this class, add the "Windows.UI.Xaml.Media.Imaging" namespace.

            BitmapImage bmp = new BitmapImage();
            bmp.SetSource(stream);
            image1.Source = bmp;


In the above code, I am creating object of BitmapImage class,  setting the source to stream and setting image control source to selected image.

I hope this is useful. Thank You.

Windows Store App Development Tutorial - Part 10 : Image Control

In this tutorial, I am going to tell about Image control in windows store app.

Image control is generally used to show image in the application. There are two ways you can add images to your application,

1. Static - Assign the URI of the image in XAML as shown below,

<Image Name="image1" Source="Assets/Logo.png" HorizontalAlignment="Left" Height="194" Margin="275,112,0,0"   VerticalAlignment="Top" Width="200" Stretch="UniformToFill"/>

2. Dynamic - We can add Images in .cs file as shown below,

image1.Source = new BitmapImage(new Uri("ms-appx:Assets/Logo.png"));

OR

BitmapImage bmp = new BitmapImage();
bmp.UriSource = new Uri(this.BaseUri,"Assets/Logo.png");
imag1.Source = bmp;

I hope this is useful. Thank You.

Thursday, 15 November 2012

Windows Store App Development Tutorial - Part 9 : Handling Files And Folders


Many time we need to access files and folders from our applications. The Windows Store apps SDK provides us Asynchronous APIs to use for this service to query files and folders. You have to be familiar with async await calls in order to get started with this.

Understand the API : 

“StorageFolder” is a class of Windows Store SDK present in the Windows.Store namespace and provides us easy access APIs to handle all file and folder operations. The class implements few interfaces named IStorageFolder, IStorageItem, IStorageFolderQueryOperations, IStorageItemProperties to manipulate folders and their contents to provides information about them.

To get the installed location of the current application package, you need to call the Package.Current.InstalledLocation property get the folder handle and store it as StorageFolder reference. This is how you can call it:

StorageFolder installedStorageFolder = Package.Current.InstalledLocation;

Let’s quickly see the API methods present in the Windows.Store.StorageFolder class. Read out the method comments to understand the API calls:

// Creates a new file in the folder or file group.
// When this method completes, it returns the new file as a StorageFile.
public IAsyncOperation<StorageFile> CreateFileAsync(string desiredName);

// Creates a new file in the current folder, and specifies what to do if a file
// with the same name already exists in the current folder.
// When this method completes, it returns the new file as a StorageFile.
public IAsyncOperation<StorageFile> CreateFileAsync(string desiredName,
CreationCollisionOption options);

// Creates a new subfolder inside the current folder.
// When this method completes, it returns the new subfolder as a StorageFolder.
public IAsyncOperation<StorageFolder> CreateFolderAsync(string desiredName);

// Creates a new sub-folder inside the current folder, and specifies what to do
// if a folder with the same name already exists in the current folder.
// When this method completes, it returns the new subfolder as a StorageFolder.
public IAsyncOperation<StorageFolder> CreateFolderAsync(string desiredName,
CreationCollisionOption options);

// Gets a single file from the current folder using the specified file name.
// When this method completes successfully, it returns a StorageFile that
// represents the file.
public IAsyncOperation<StorageFile> GetFileAsync(string name);

// Gets a single sub-folder from the current folder using the specified folder name.
// When this method completes successfully, it returns a StorageFolder that
// represents the sub-folder.
public IAsyncOperation<StorageFolder> GetFolderAsync(string name);

// Gets a single file or sub-folder from the current folder using the name
// of the item. When this method completes successfully, it returns the file or folder.
public IAsyncOperation<IStorageItem> GetItemAsync(string name);

// Gets the top-level files in the current folder.
// When this method completes successfully, it returns a list of the files
// in the folder. Each file in the list is represented by a StorageFile object.
public IAsyncOperation<IReadOnlyList<StorageFile>> GetFilesAsync();

// Gets a list of the top-level sub-folders of the current folder.
// When this method completes successfully, it returns a list of the files.
// Each folder in the list is represented by a StorageFolder.
public IAsyncOperation<IReadOnlyList<StorageFolder>> GetFoldersAsync();

// Gets a list of top-level files and sub-folders inside the current folder.
// When this method completes successfully, it returns a list of the files
// and folders inside the current folder. The items in the
// list are represented by objects of type IStorageItem.
public IAsyncOperation<IReadOnlyList<IStorageItem>> GetItemsAsync();

// Renames the current folder.
// No object or value is returned by this method when it completes.
public IAsyncAction RenameAsync(string desiredName);

// Renames the current folder and specifies what to do if a folder with the
// same name already exists. No object or value is returned by this method
// when it completes.
public IAsyncAction RenameAsync(string desiredName, NameCollisionOption option);

// Deletes the current folder or file group.
// No object or value is returned by this method when it completes.
public IAsyncAction DeleteAsync();

// Deletes the current folder or file group, optionally deleting it permanently.
// No object or value is returned by this method when it completes.
public IAsyncAction DeleteAsync(StorageDeleteOption option);

// When this method completes successfully, it returns a list of the files
// in the folder. Each file in the list is represented by a StorageFile object.
public IAsyncOperation<IReadOnlyList<StorageFile>> GetFilesAsync(CommonFileQuery query,
uint startIndex,
uint maxItemsToRetrieve);

// Gets a list of all files in the current folder and its sub-folders.
// Files are filtered and sorted based on the specified CommonFileQuery.
// When this method completes successfully, it returns a list of the files
// in the folder. Each file in the list is represented by a StorageFile object.
public IAsyncOperation<IReadOnlyList<StorageFile>> GetFilesAsync(CommonFileQuery query);

// Gets an index-based range of StorageFolder objects that represent groups of files
// in the current folder. Files are filtered and grouped based on the specified
// CommonFolderQuery and are included in the range based on the resulting indexes.
// When this method completes successfully, it returns a list of the files.
// Each folder in the list is represented by a StorageFolder.
public IAsyncOperation<IReadOnlyList<StorageFolder>> GetFoldersAsync(CommonFolderQuery query,
uint startIndex,
uint maxItemsToRetrieve);

// Gets a list of StorageFolder objects that represent groups of files in the
// current folder. Files are filtered and grouped based on the specified CommonFolderQuery.
// When this method completes successfully, it returns a list of the files (type IVectorView).
// Each folder in the list is represented by a StorageFolder.
public IAsyncOperation<IReadOnlyList<StorageFolder>> GetFoldersAsync(CommonFolderQuery query);

// Gets a StorageFolder that represents the folder at the specified file-system path.
// When this method completes successfully, it returns a StorageFolder that represents the
// folder.

public static IAsyncOperation<StorageFolder> GetFolderFromPathAsync(string path);

The above API methods will provide you instance towards the StorageFolder asynchronously. When you are calling it from a method, you must have to mark the method as async and the call must be marked as await.

The StorageFolder instance also provides you few information about the file and folder by exposing few properties. You can directly call those properties to grab the information.

Here are the properties that the StorageFolder exposes to the developers:

// Gets the attributes of the current folder.
public FileAttributes Attributes { [MethodImpl] get; }

// Gets the date and time that the current folder was created.
public DateTimeOffset DateCreated { [MethodImpl] get; }

// Gets the name of the current folder.
public string Name { [MethodImpl] get; }

// Gets the full file-system path of the current folder, if the folder has a path.
public string Path { [MethodImpl] get; }

// Gets the user-friendly name of the current folder.
public string DisplayName { [MethodImpl] get; }

// Gets the user-friendly type of the folder or file group.
public string DisplayType { [MethodImpl] get; }

// Gets an identifier for the current folder. This ID is unique for the query result
// or StorageFolder that contains the current folder or file group, and can be used
// to distinguish between items that have the same name.
public string FolderRelativeId { [MethodImpl] get; }

// Gets an object that provides access to the content-related properties
// of the current folder.
public StorageItemContentProperties Properties { [MethodImpl] get; }

You can easily understand the need of each property from the above property level comments mentioned above.

How to Use The API's :

In case you need to create or get an instance of file or folder inside your application’s root folder, you first need an instance of the installed directory which you can grab by calling Package.Current.InstalledLocation as mentioned above. Once you have the instance of the same, you can easily call the above APIs and pass required parameters to do so.

Let me show you how to create and get folders and files easily with the APIs present in Windows.Store.StorageFolder class:

// ways to create new folder
folder.CreateFolderAsync("Demo Folder", CreationCollisionOption.FailIfExists);
folder.CreateFolderAsync("Demo Folder", CreationCollisionOption.GenerateUniqueName);
folder.CreateFolderAsync("Demo Folder", CreationCollisionOption.OpenIfExists);
folder.CreateFolderAsync("Demo Folder", CreationCollisionOption.ReplaceExisting);

// ways to get folder
folder.GetFolderAsync("Demo Folder");

// ways to create new file
folder.CreateFileAsync("Demo File.txt", CreationCollisionOption.OpenIfExists);
folder.CreateFileAsync("Demo File.txt", CreationCollisionOption.GenerateUniqueName);
folder.CreateFileAsync("Demo File.txt", CreationCollisionOption.OpenIfExists);
folder.CreateFileAsync("Demo File.txt", CreationCollisionOption.ReplaceExisting);

// ways to get file
folder.GetFileAsync("Demo File.txt");

// ways to get all files by search queries
folder.GetFilesAsync(CommonFileQuery.DefaultQuery);
folder.GetFilesAsync(CommonFileQuery.OrderByDate);
folder.GetFilesAsync(CommonFileQuery.OrderByMusicProperties);
folder.GetFilesAsync(CommonFileQuery.OrderByName);
folder.GetFilesAsync(CommonFileQuery.OrderBySearchRank);
folder.GetFilesAsync(CommonFileQuery.OrderByTitle);

In case you want to rename current folder handle, just call the API folder.RenameAsync(desiredName) with proper desired name and this will fire the rename operation on it.

The delete operation is also easy on a storage folder instance. You can do so by calling the DeleteAsync() method by passing proper parameters to it. There is an option to chose whether you want to use the default system delete operation or a permanent delete. In case of permanent delete operation, your folder will be deleted permanently without sending it to the recycle bin.

Here is how you can achieve this:

// ways to delete a folder instance
folder.DeleteAsync(StorageDeleteOption.Default);
folder.DeleteAsync(StorageDeleteOption.PermanentDelete);

I hope this is useful. Thank You.
 

Wednesday, 14 November 2012

Windows Store App Development Tutorial - Part 8 : Integrating Setting Panel In Charm Bar

Many of us need to integrate settings page in our applications. All we generally do is by creating a separate page in our project. But Windows 8 provide us a separate settings panel in Charm bar which you can use for your settings page.

Charm bar is the floated vertical bar attached at the right side of the screen, consists of Search, Share, Start, Devices and Settings button to invoke appropriate commands. You can bring the charm bar by moving your mouse pointer at the top right corner of the screen. Here’s the screenshot of the charm bar (rotated 90 degree in left direction to accumulate in this post):


Clicking the settings button there in the charm bar, brings the settings panel in the screen where you can show application specific settings/configurations.

To integrate your settings panel in your application, you need to add application specific commands in the settings panel. To do this, you need to register the “CommandsRequested” event in your page. You can chose between application level or page level settings panel.

Write the following code to register the event first:

SettingsPane.GetForCurrentView().CommandsRequested += OnSettingsPaneCommandRequested;

Then you need to add the specific commands one by one in the settings panel from the commands requested event implementation. Add settings command to the pane by following the below code snippet:

private void OnSettingsPaneCommandRequested(SettingsPane sender,
                                                             SettingsPaneCommandsRequestedEventArgs args)
{
// Add the commands one by one to the settings panel
args.Request.ApplicationCommands.Add(new SettingsCommand("commandID",
                                                            "Command Name", DoOperation));
}

private void DoOperation(IUICommand command)
{
// Write the logic here that you want to do, when the user clicks it

}
 
Once you integrate this in your page, you will see something similar to this in your settings pane as shown in the below screenshot:

In case you want to invoke the settings pane to show by a button click, you can write the below code in the button click implementation:

SettingsPane.Show();

That’s all to integrate the settings pane in your Windows Store application. I hope, this will now help you to understand the settings pane integration. 


Monday, 5 November 2012

Windows Store App Development Tutorial - Part 7 : Know About LayoutAwarePage

Today in this chapter we will discuss more advanced page navigation using the LayoutAwarePage which comes with the Grid and Split application template by default.

Continuing the last chapter on Learning Windows Store application, today we will explore more about the standard navigation. If you create a Grid app or a Split app, you will find some common files created inside the project under the “Common” folder. Among them “LayoutAwarePage” implements many navigational APIs to do the standard navigational operations.


“LayoutAwarePage” inherits from “Page” and hence you will be able to use all the basic operations that Page class offers you. In addition to those, you will find more new APIs in that. If you are using a blank XAML page, you just have to use “LayoutAwarePage” insists of “Page” as shown below in order to use the advanced layout and navigation features,


It is always better to use this class as the root of the page if you are using navigations from one page to another. The important methods that you will be able to use from this page are: “GoHome()”, “GoBack()” and “GoForward()” which implicitly calls the Frame methods to complete these operations. The implementation of those methods are shared here for clear visibility:

// Invoked as an event handler to navigate backward in the page's associated
// Frame until it reaches the top of the navigation stack.
protected virtual void GoHome(object sender, RoutedEventArgs e)
{
// Use the navigation frame to return to the topmost page
if (this.Frame != null)
{
while (this.Frame.CanGoBack) this.Frame.GoBack();
}
}

// Invoked as an event handler to navigate backward in the navigation stack
// associated with this page's Frame.
protected virtual void GoBack(object sender, RoutedEventArgs e)
{
// Use the navigation frame to return to the previous page
if (this.Frame != null && this.Frame.CanGoBack) this.Frame.GoBack();
}

// Invoked as an event handler to navigate forward in the navigation stack
// associated with this page's Frame
protected virtual void GoForward(object sender, RoutedEventArgs e)
{
// Use the navigation frame to move to the next page
if (this.Frame != null && this.Frame.CanGoForward) this.Frame.GoForward();
}

To see how these methods work, you can chose any one of the Grid and Split applications from the Windows Store project template. Let’s take Grid app for an example here. The main screen of the Grid app uses a GridView to show thumbnails of the groups as below:


Clicking the group header will navigate you to the group details page. 


Similarly clicking the items from the group page or group details page will navigate you to the group item details page. You can easily navigate to the next or previous item by just sliding the screen or navigational keys of the keyboard.


This navigational operations are handle by the two events named AcceleratorKeyActivated and PointerPressed of the core window. The first invokes when a user uses keystrokes to navigate and the second one invokes when a user uses mouse clicks, touch screen taps or other similar interactions to navigate between pages. Here comes the declaration of the said events:


// Invoked on every keystroke, including system keys such as Alt key combinations,
// when this page is active and occupies the entire window. Used to detect keyboard
// navigation between pages even when the page itself doesn't have focus.
private void CoreDispatcher_AcceleratorKeyActivated(CoreDispatcher sender,
AcceleratorKeyEventArgs args);

// Invoked on every mouse click, touch screen tap, or equivalent interaction when
// this page is active and occupies the entire window. Used to detect browser-style
// next and previous mouse button clicks to navigate between pages.
private void CoreWindow_PointerPressed(CoreWindow sender, PointerEventArgs args);


In the below screenshot you can see the navigational arrows that pops up when you move your mouse inside the screen. An user can easily navigate between the pages by tapping those buttons or pressing the navigational keys in the keyboard. 


Not only this, the LayoutAwarePage also automatically handles the screen orientation changes properly. You can use visual states of each pages to visualize the screen orientation and view.

Hope this is useful. Thank You. 

Windows Store App Development Tutorial - Part 6 : Navigate Between Page


Page Navigation :

It’s not at all difficult to implement the navigation in Windows Store applications but if you are a Silverlight and/or Windows Phone application developer and just moved to this field, you might find difficulty developing a navigation application. In Windows Phone, we use NavigationService.Navigate() to navigate to a different page from a page. Also, we pass a relative or absolute URL to the Navigate() method. Here it’s bit different. Let’s discuss on it more.

In Windows 8 Store applications, every page has a “Frame” object, which implements the following properties and methods to support easy navigations:

GoBack() : Navigates to the most recent item in back navigation history, if a Frame manages its own   navigation history.
GoForward() : Navigates to the most recent item in forward navigation history, if a Frame manages its own   navigation history.
Navigate(type,args) : Navigates to the page specified
BackStackDepth : The number of entries in the navigation back stack
CanGoBack :Gets a value that indicates whether there is at least one entry in back navigation history
CanGoForward : Gets a value that indicates whether there is at least one entry in forward navigation history.


Check out the parameters of Navigate(type, args) method. You can see that, you can’t pass navigation Uri like we did in Silverlight and Windows Phone. Instead of passing the relative/absolute Uri path here, we have to pass the type of the page.

Let’s suppose we want to navigate from MainPage.xaml to SecondaryPage.xaml. You have to call navigate method by passing the type of second page. For example:

// simple navigation
Frame.Navigate(typeof(SecondaryPage)); 

// navigation with query parameter
Frame.Navigate(typeof(SecondaryPage), obj);

Sample :

Once you created the project, you will find a page called “MainPage.xaml”. Open it and modify the XAML code with a Button and a TextBlock as shown below :

<Page
    x:Class="SimpleNavigation.MainPage"
    xmlns="http://schemas.microsoft.com/winfx/2006/xaml/presentation"
    xmlns:x="http://schemas.microsoft.com/winfx/2006/xaml"
    xmlns:local="using:SimpleNavigation"
    xmlns:d="http://schemas.microsoft.com/expression/blend/2008"
    xmlns:mc="http://schemas.openxmlformats.org/markup-compatibility/2006"
    mc:Ignorable="d">

    <Grid Background="{StaticResource ApplicationPageBackgroundThemeBrush}">
        <TextBlock Text="Main Page" Style="{StaticResource HeaderTextStyle}"
                   Margin="100,50"/>
        <Button Style="{StaticResource BackButtonStyle}" Margin="403,0,0,668"
                RenderTransformOrigin="0.5, 0.5" Tapped="OnNextButtonTapped">
            <Button.RenderTransform>
                <RotateTransform Angle="180"/>
            </Button.RenderTransform>
        </Button>
    </Grid>
</Page>

  
This will change the MainPage UI as shown below. We will implement the next button tap event to handle the navigation to a different page later.


Now create another page named as “SecondaryPage.xaml” in the root folder and modify this page with the following code. This will have a back button and a TextBlock.

<Page
    x:Class="SimpleNavigation.SecondaryPage"
    xmlns="http://schemas.microsoft.com/winfx/2006/xaml/presentation"
    xmlns:x="http://schemas.microsoft.com/winfx/2006/xaml"
    xmlns:local="using:SimpleNavigation"
    xmlns:d="http://schemas.microsoft.com/expression/blend/2008"
    xmlns:mc="http://schemas.openxmlformats.org/markup-compatibility/2006"
    mc:Ignorable="d">
    <Grid Background="{StaticResource ApplicationPageBackgroundThemeBrush}">
        <TextBlock Text="Secondary Page" Style="{StaticResource HeaderTextStyle}"
                   Margin="100,50"/>
        <Button Style="{StaticResource BackButtonStyle}" Margin="29,0,0,674"
               Tapped="OnBackButtonTapped"/>
    </Grid>
</Page>


The new page will look as below. Here the back button implementation will have logic to navigate to the previous page in the navigation stack.


This ends the basic design of our sample application.

Implementing Navigation Between Pages : 

To implement the navigation between those pages, you need to modify the code behind of both the pages. In both the cs file, you will find the Tap event. In the MainPage.xaml.cs implementation, call the Navigate() method and pass the other page type as shown below, which when called will navigate you to the secondary page:

// Next button tap implementation (in MainPage.xaml.cs)
private void OnNextButtonTapped(object sender, TappedRoutedEventArgs e)
{
Frame.Navigate(typeof (SecondaryPage));
}

// Back button tap implementation (in SecondaryPage.xaml.cs)
private void OnBackButtonTapped(object sender, TappedRoutedEventArgs e)
{
this.Frame.Navigate(typeof(MainPage));
}

As mentioned above, if you want to pass a query string parameter to the second page where you are navigating to, you can do so by passing the value or object as second parameter to the Navigate() method.

Hope this is useful. Thank You.