Wednesday, 18 September 2013

HTML5 Audio & Video - Cross Browser


Benefits of HTML5 Media is that you can leverage your HTML, CSS and JavaScript skills rather than learning Flash or Silverlight. If you can create buttons in HTML and control them with JavaScript, you already know all you need to develop HTML5 media. HTML5 media has built-in support for captions and subtitles using the new track element, and proposals for additional features—such as direct byte access for video manipulation—are already being considered.

HTML5 Video & Audio tags works perfectly in IE 9 and above, Firefox & Chrome since these browsers support for HTML5. These browsers support for MP4, Ogg & WebM files. MP4 support for the remaining one third (Windows XP, Mac OS X and Linux) in Firefox is still in progress.

HTML5 Video & Audio JavaScript Libraries:

To make HTML5 Video work in IE8, you need to include some javascript, flash & css files. This javascript create flash player and add all controls(play/pause, time duration, time rail, volume, full screen etc) explicitly. In HTML5 Video tag, you will get all these in-built. Since IE8 doesn't support video tag, we have to add flash player, all these controls.

There are many javascript libraries are available for cross-browsing. Here I am using mediaelement.js file. You can download it from here, http://mediaelementjs.com/. You need to add, mediaelement.js, mediaelementplayer.css & flashmediaelement.swf files into your solution. You will get all these files in build folder of downloaded file.

Step 1: Add Scripts & Styles:
<code><script src="jquery.js"></scrupt>
<script src="mediaelement-and-player.min.js"></script>
<link rel="stylesheet" href="mediaelementplayer.css"/></code>

Step 2: Add Video tag
<video src="myvideo.mp4" width="320" height="240"></video>

Step 3: Convert all <video> tags to MediaElement.js using jQuery
<script>
// using jQuery
$('video').mediaelementplayer(/* Options */);
</script> 


Now the video works fine in IE 8. Make sure you will copy all the image files from downloaded file, otherwise you cannot see play/pause, volume, time rail & etc buttons.

Step 4: Player options
You can five some of the player options which are not mandatory ofcource.

$('video').mediaelementplayer({
    // if the <video width> is not specified, this is the default
    defaultVideoWidth: 480,
    // if the <video height> is not specified, this is the default
    defaultVideoHeight: 270,
    // if set, overrides <video width>
    videoWidth: -1,
    // if set, overrides <video height>
    videoHeight: -1,
    // width of audio player
    audioWidth: 400,
    // height of audio player
    audioHeight: 30,
    // initial volume when the player starts
    startVolume: 0.8,
    // useful for <audio> player loops
    loop: false,
    // enables Flash and Silverlight to resize to content size
    enableAutosize: true,
    // the order of controls you want on the control bar (and other plugins below)
    features: ['playpause','progress','current','duration','tracks','volume','fullscreen'],
    // Hide controls when playing and mouse is not over the video
    alwaysShowControls: false,
    // force iPad's native controls
    iPadUseNativeControls: false,
    // force iPhone's native controls
    iPhoneUseNativeControls: false,
    // force Android's native controls
    AndroidUseNativeControls: false,
    // forces the hour marker (##:00:00)
    alwaysShowHours: false,
    // show framecount in timecode (##:00:00:00)
    showTimecodeFrameCount: false,
    // used when showTimecodeFrameCount is set to true
    framesPerSecond: 25,
    // turns keyboard support on and off for this instance
    enableKeyboard: true,
    // when this player starts, it will pause other players
    pauseOtherPlayers: true,
    // array of keyboard commands
    keyActions: []
});


Enjoy HTML5 Video in IE8. Remember, this works fine in IE7 too.

Hope this is useful

Thank you.


Thursday, 18 April 2013

Bing Map On Windows Store App

In this tutorial I will explain how to use Bing Map for Windows Store Application.Here I will explain how to display your location on a Bing Map and then test your app with a variety of locations using the Simulator included in Microsoft Visual Studio 2012.

Step 1 : Download and install Bing Map SDK for Windows Store App. In Visual Studio 2012, go to Tools|Extensions and Updates. Click on online and write Bing Map SDK in search box. Install Bing Map SDK for Windows Store.


Step 2 : Register and create Bing Map Keys for your application. Register as a user on the Bing Maps Portal and then follow the instructions for Getting a Bing Maps Key for your app. Later, we'll use the key that is generated when we insert the Bing Maps control into our project.

Step 3: Open of Visual Studio 2012. 

Step 4: Create a new project
Create a new project, choosing a Blank App (XAML) from the Visual C# > Windows Store project types. Name your app SimpleMapping.

Step 5: Set your target platform. Open the Configuration Manager from the Build menu and set your Active solution platform to x86 or x64.


Step 6: Add the Bing Maps references. In the Solution Explorer, right-click References and add references to Bing Maps for C#, C++, or Visual Basic and Microsoft Visual C++ Runtime Package.

Step 7: Set the Location capability. Open the Package.appxmanifest file and go to the Capabilities tab. Select the Location capability.

Step 8: Add classes for the 10-meter and 100-meter location icons

  1. In the Solution Explorer, right-click the SimpleMapping project and add a New Item. Select User Control and name the page LocationIcon10m.xaml.
  2. Open LocationIcon10m.xaml and copy the following XML into it (replacing the original contents of the file). This code provides an icon to display when the location data is accurate down to about 10 meter.
     
    <UserControl
        x:Class="SimpleMapping.LocationIcon10m"
        xmlns="http://schemas.microsoft.com/winfx/2006/xaml/presentation"
        xmlns:x="http://schemas.microsoft.com/winfx/2006/xaml"
        xmlns:local="using:SimpleMapping"
        xmlns:d="http://schemas.microsoft.com/expression/blend/2008"
        xmlns:mc="http://schemas.openxmlformats.org/markup-compatibility/2006"
        mc:Ignorable="d">
    
        <Canvas>
            <Ellipse Height="25" Width="25" Fill="#FFF0F0F0" Margin="-12.5,-12.5,0,0"></Ellipse>
            <Ellipse Height="20" Width="20" Fill="Black" Margin="-10,-10,0,0"></Ellipse>
            <Ellipse Height="10" Width="10" Fill="White" Margin="-5,-5,0,0"></Ellipse>
        </Canvas>
    
    </UserControl> 
     
  3. In the Solution Explorer, right-click the SimpleMapping project and add a New Item. Select User Control and name the page LocationIcon100m.xaml.
  4. Open LocationIcon100m.xaml and copy the following XML into it (replacing the original contents of the file). This code provides an icon to display when the location data is accurate down to about 100 meters. Note that if we have even less accurate data, we will not display an icon and will only show a region on the map.
     
    <UserControl
        x:Class="SimpleMapping.LocationIcon100m"
        xmlns="http://schemas.microsoft.com/winfx/2006/xaml/presentation"
        xmlns:x="http://schemas.microsoft.com/winfx/2006/xaml"
        xmlns:local="using:SimpleMapping"
        xmlns:d="http://schemas.microsoft.com/expression/blend/2008"
        xmlns:mc="http://schemas.openxmlformats.org/markup-compatibility/2006"
        mc:Ignorable="d">
    
        <Canvas>
            <Ellipse Height="55" Width="55" Fill="Black" Opacity=".35" Margin="-27.5,-27.5,0,0"></Ellipse>
            <Ellipse Height="50" Width="50" Fill="CornflowerBlue" Opacity=".65" Margin="-25,-25,0,0"></Ellipse>
            <Ellipse Height="25" Width="25" Fill="#FFF0F0F0" Margin="-12.5,-12.5,0,0"></Ellipse>
            <Ellipse Height="20" Width="20" Fill="Black" Margin="-10,-10,0,0"></Ellipse>
            <Ellipse Height="10" Width="10" Fill="White" Margin="-5,-5,0,0"></Ellipse>
        </Canvas>
    </UserControl>
    
    
 Step 9: Lay out a page to display the map
  1. Open the file MainPage.xaml and copy the following XML into it (replacing its original contents). This XML will display one button for retrieving the location, one button to cancel the operation, six text boxes for displaying the location data and labels, and one map control for displaying the location.
     
    <Grid>
     
    <Button x:Name="MapCurrentLoc" Content="Map Current Location" HorizontalAlignment="Left" Margin="29,31,1157,0" VerticalAlignment="Top" Click="MapLocationButton_Click" Height="38"/>
    <Maps:Map x:Name="Map" Margin="0,120,0,0" Credentials="Insert Your Bing Maps Key Here"/>
    <Button x:Name="CancelGetLocationButton" Content="Cancel" HorizontalAlignment="Left" Margin="242,31,0,0" VerticalAlignment="Top" Click="CancelGetLocationButton_Click"/>
    <TextBox x:Name="MessageTextbox" HorizontalAlignment="Left" Margin="354,37,0,0" TextWrapping="Wrap" VerticalAlignment="Top" Width="605" Background="{StaticResource ButtonBackgroundThemeBrush}" Foreground="{StaticResource ButtonForegroundThemeBrush}" BorderBrush="{StaticResource ButtonBackgroundThemeBrush}"/>
    <TextBox HorizontalAlignment="Left" Margin="1046,10,0,0" TextWrapping="Wrap" Text="Latitude:" VerticalAlignment="Top" Background="{StaticResource ButtonBackgroundThemeBrush}" BorderBrush="{StaticResource ButtonBackgroundThemeBrush}" Foreground="{StaticResource ButtonForegroundThemeBrush}"/>
    <TextBox HorizontalAlignment="Left" Margin="1046,42,0,0" TextWrapping="Wrap" Text="Longitude:" VerticalAlignment="Top" Background="{StaticResource ButtonBackgroundThemeBrush}" BorderBrush="{StaticResource ButtonBackgroundThemeBrush}" Foreground="{StaticResource ButtonForegroundThemeBrush}"/>
    <TextBox HorizontalAlignment="Left" Margin="1046,74,0,0" TextWrapping="Wrap" Text="Accuracy:" VerticalAlignment="Top" Background="{StaticResource ButtonBackgroundThemeBrush}" BorderBrush="{StaticResource ButtonBackgroundThemeBrush}" Foreground="{StaticResource ButtonForegroundThemeBrush}"/>
    <TextBox x:Name="LatitudeTextbox" HorizontalAlignment="Left" Margin="1165,10,0,0" TextWrapping="Wrap" VerticalAlignment="Top" Background="{StaticResource ButtonBackgroundThemeBrush}" BorderBrush="{StaticResource ButtonBackgroundThemeBrush}" Foreground="{StaticResource ButtonForegroundThemeBrush}"/>
    <TextBox x:Name="LongitudeTextbox" HorizontalAlignment="Left" Margin="1165,42,0,0" TextWrapping="Wrap" VerticalAlignment="Top" Background="{StaticResource ButtonBackgroundThemeBrush}" BorderBrush="{StaticResource ButtonBackgroundThemeBrush}" Foreground="{StaticResource ButtonForegroundThemeBrush}"/>
    <TextBox x:Name="AccuracyTextbox" HorizontalAlignment="Left" Margin="1165,74,0,0" TextWrapping="Wrap" VerticalAlignment="Top" Background="{StaticResource ButtonBackgroundThemeBrush}" BorderBrush="{StaticResource ButtonBackgroundThemeBrush}" Foreground="{StaticResource ButtonForegroundThemeBrush}"/>
     
    </Grid>
  2. Insert the Bing Maps Key you acquired earlier into the Map control's Credentials attribute.


Step 10 : Add namespaces in your MainPage.xaml.cs file

using Windows.Devices.Geolocation;
using System.Threading;
using System.Threading.Tasks;
using Bing.Maps;

Step 11: Add the member variables in your MainPage.xaml.cs file

public sealed partial class MainPage : Page
{
   // member variables to add
   private Geolocator _geolocator = null;
   private CancellationTokenSource _cts = null;
   LocationIcon10m _locationIcon10m;
   LocationIcon100m _locationIcon100m;

 Step 12 : Initialize the member variables

 public MainPage()
 {
     this.InitializeComponent();
     _geolocator = new Geolocator();
     _locationIcon10m = new LocationIcon10m();
     _locationIcon100m = new LocationIcon100m();
 }

 Step 13 : Handle the OnNavigatedTo event. In MainPage.xaml.cs, replace the OnNavigatedTo event handler with this code, which initializes the states of the Get Location and Cancel buttons.

protected override void OnNavigatedTo(NavigationEventArgs e)
{
      MapCurrentLoc.IsEnabled = true;
      CancelGetLocationButton.IsEnabled = false;
}

Step 14 : Handle the MapCurrentLoc_Click event. Write the following in that event,

 private async void MapCurrentLoc_Click(object sender, RoutedEventArgs e)
 {
     // Change the state of our buttons.
     MapCurrentLoc.IsEnabled = false;
     CancelGetLocationButton.IsEnabled = true;

     // Remove any previous location icon.
     if (Map.Children.Count > 0)
     {
        Map.Children.RemoveAt(0);
     }

     try
     {
        // Get the cancellation token.
        _cts = new CancellationTokenSource();
        CancellationToken token = _cts.Token;
 

        MessageTextbox.Text = "Waiting for update...";

                // Get the location.
                Geoposition pos = await _geolocator.GetGeopositionAsync().AsTask(token);

                MessageTextbox.Text = "";

                Location location = new Location(pos.Coordinate.Latitude, pos.Coordinate.Longitude);

                // Now set the zoom level of the map based on the accuracy of our location data.
                // Default to IP level accuracy. We only show the region at this level - No icon is displayed.
                double zoomLevel = 13.0f;

                // if we have GPS level accuracy
                if (pos.Coordinate.Accuracy <= 10)
                {
                    // Add the 10m icon and zoom closer.
                    Map.Children.Add(_locationIcon10m);
                    MapLayer.SetPosition(_locationIcon10m, location);
                    zoomLevel = 15.0f;
                }
                // Else if we have Wi-Fi level accuracy.
                else if (pos.Coordinate.Accuracy <= 100)
                {
                    // Add the 100m icon and zoom a little closer.
                    Map.Children.Add(_locationIcon100m);
                    MapLayer.SetPosition(_locationIcon100m, location);
                    zoomLevel = 14.0f;
                }

                // Set the map to the given location and zoom level.
                Map.SetView(location, zoomLevel);

                // Display the location information in the textboxes.
                LatitudeTextbox.Text = pos.Coordinate.Latitude.ToString();
                LongitudeTextbox.Text = pos.Coordinate.Longitude.ToString();
                AccuracyTextbox.Text = pos.Coordinate.Accuracy.ToString();
            }
            catch (System.UnauthorizedAccessException)
            {
                MessageTextbox.Text = "Location disabled.";

                LatitudeTextbox.Text = "No data";
                LongitudeTextbox.Text = "No data";
                AccuracyTextbox.Text = "No data";
            }
            catch (TaskCanceledException)
            {
                MessageTextbox.Text = "Operation canceled.";
            }
            finallyep
            {
                _cts = null;
            }

            // Reset the buttons.
            MapCurrentLoc.IsEnabled = true;
            CancelGetLocationButton.IsEnabled = false;
        }


 The above code performs the following,
  • Changes the state of the Get Location and Cancel buttons.
  • Removes any previous location icon that may have been used.
  • Sets up a cancellation token so that the user can cancel the operation if it is taking too long.
  • Asynchronously gets the location.
  • Selects a location icon based on the accuracy of the data retrieved.
  • Set the map to the location.
  • Handles some error conditions.
  • Resets the buttons after the location has been retrieved. 

Step 15: Handle the CancelGetLocationButton_Click event. Write the following code in that method.
This code cancels the asynchronous call to get the location if the user presses the Cancel button. It also resets the state of the buttons.

 private void CancelGetLocationButton_Click(object sender, RoutedEventArgs e)
        {
            if (_cts != null)
            {
                _cts.Cancel();
                _cts = null;
            }

            MapCurrentLoc.IsEnabled = true;
            CancelGetLocationButton.IsEnabled = false;
        }
 

Step 16: Handle the OnNavigatingFrom event. Write the following code in that event handler.
This code cancels the asynchronous call to get the location if the user leaves the page.

protected override void OnNavigatingFrom(NavigatingCancelEventArgs e)
        {
            if (_cts != null)
            {
                _cts.Cancel();
                _cts = null;
            }

            base.OnNavigatingFrom(e);
        }

Step 17: Build and run the app.

  1. The first time you run the sample, a prompt asks whether the app can use your location. Choose the Allow option.
  2. Click the Get Location button to get the current location.

Step 18: Test the app in the Simulator. To test your app with different locations, change the Target Device in Visual Studio 2012 from Local Machine to Simulator. 


This is how Bing map works on Windows Store App.

Thanks.


Tuesday, 16 April 2013

SQLite In Windows Store App

The first thing you need to do is get SQLite. Select Tools|Extensions and Updates. In the Extensions and Updates dialog, select Online. Type sqlite in the search box. You will see SQLite for Windows Runtime. This is the SQLite binaries packaged up by the SQLite team. Install this.


Next, create a new C# Windows Store project. Select the Blank App template and name the project SQLiteDemo. Next, add a reference to both SQLite and the VC++ Runtime Package.


After you add the references, you will notice yellow triangles in the Solution Explorer. This is never a good sign. Build the app and you will see the following errors:


When you create a new C# or VB Windows Store project in Visual Studio, it supports all architectures (x86, x64 and ARM) by default. But since you added SQLite to the project, you can’t build one package that targets all architectures. You have to build one target for each. Select Build|Configuration Manager and select x86, x64 or ARM from the Platform drop-down list. Now the project builds. 

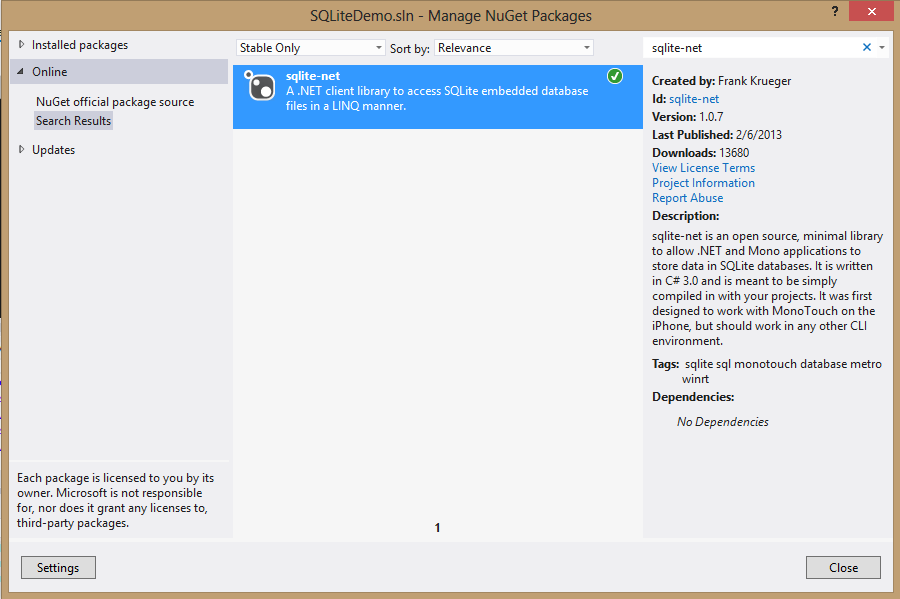
Before you write code to work with SQLite, you should add a NuGet package that will make your life easier. Select Tools|Library Package Manager|Manage NuGet Packages for Solution. In the Manage NuGet Packages dialog, select Online and type sqlite-net in the search text box. The sqlite-net package enables you to work with SQLite databases using a LINQ syntax. After you install it, you will see two new files in your project: SQLite.cs and SQLiteAsync.cs.

NOTE: You can also install this package using the Package Manager Console. Select Tools|Library Package Manager|Package Manager Console and type install-package sqlite-net

Now you are ready to work with SQLite.

Add a new class. If you want to create a table with two fields, just create a class with two objects as follows. Include "using SQLite" namespace.

[Table("Users")]
    class UserInfo
    {
        [PrimaryKey, Unique]
        public int uId { get; set; }
        public string uName { get; set; }
    }

In above code, we created a Table with fields, uId as PrimaryKey and uName.

Write the following code to create database,

 try
 {
        var path = ApplicationData.Current.LocalFolder.Path + @"\users.db";
        var db = new SQLiteAsyncConnection(path);
        await db.CreateTableAsync<UserInfo>();
 }
 catch { }

In the above code, we are creating database "users" then connecting that database and creating a table asynchronously.

Design the page as shows below,


 XAML code for above design is,


    <Grid Background="{StaticResource ApplicationPageBackgroundThemeBrush}">
        <TextBlock HorizontalAlignment="Left" TextWrapping="Wrap" Text="Uid" VerticalAlignment="Top" Margin="130,124,0,0" Height="51" Width="114" FontSize="36"/>
        <TextBox x:Name="uidtxt" HorizontalAlignment="Left" TextWrapping="Wrap" VerticalAlignment="Top" Margin="276,130,0,0" Width="228" Height="45"/>
        <TextBlock HorizontalAlignment="Left" TextWrapping="Wrap" Text="Name" VerticalAlignment="Top" Margin="130,231,0,0" Height="54" Width="114" FontSize="36"/>
        <TextBox x:Name="unametxt" HorizontalAlignment="Left" TextWrapping="Wrap" VerticalAlignment="Top" Margin="276,231,0,0" Height="41" Width="228"/>
        <Button x:Name="submit" Content="Submit" HorizontalAlignment="Left" VerticalAlignment="Top" Margin="174,324,0,0" Height="51" Width="116"/>
        <Button x:Name="display" HorizontalAlignment="Left" VerticalAlignment="Top" Height="49" Width="113" Margin="333,326,0,0" Content="Display"/>
    </Grid>

After entering data, when I click on Submit button, data should store in a table, following is a code for that,

 var path = ApplicationData.Current.LocalFolder.Path + @"\users.db";
            var db = new SQLiteAsyncConnection(path);

            var data = new UserInfo
            {
                uId = int.Parse(uidtxt.Text),
                uName = unametxt.Text
            };

            int x = await db.InsertAsync(data);

In the above code we are reading the two TextBoxes Data into a variable called “data” and then we are inserting that data into the table.

When I click on Display button, data should display which is stored in table.

            string Result = "";
            var path = ApplicationData.Current.LocalFolder.Path + @"\users.db";
            var db = new SQLiteAsyncConnection(path);
            List<UserInfo> allUsers = await db.QueryAsync<UserInfo>("Select * From Users");
            var count = allUsers.Any() ? allUsers.Count : 0;
            foreach (var item in allUsers)
            {
                Result += "Email: " + item.uId.ToString() + "\nFirst Name: " + item.uName + "\n\n";
            }

            MessageDialog dialog = new MessageDialog(Result.ToString());
            await dialog.ShowAsync();


 In above code, I am retrieving data and displaying in MessageDialog.

 It will display all data which is stored in table.

Thursday, 21 March 2013

Windows Store App Development Tutorial - Part 12 : FileSavePicker - Saving Image and Text File

In this tutorial, we learn what is FileSavePicker and how to use it in order to save image and text file.

FileSavePicker allows users to specify the name and location of where they want to save your app's content.


First will see how to save an text file.


In this sample,we take one button that is used to open the FileSavePicker and a textblock to show the status message.

XAML Code:

<Page
    x:Class="SampleFileSavePicker.MainPage"
    xmlns="http://schemas.microsoft.com/winfx/2006/xaml/presentation"
    xmlns:x="http://schemas.microsoft.com/winfx/2006/xaml"
    xmlns:local="using:SampleFileSavePicker"
    xmlns:d="http://schemas.microsoft.com/expression/blend/2008"
    xmlns:mc="http://schemas.openxmlformats.org/markup-compatibility/2006"
    mc:Ignorable="d">

    <Grid Background="{StaticResource ApplicationPageBackgroundThemeBrush}">
        <TextBox x:Name="text1" HorizontalAlignment="Left" TextWrapping="Wrap" Text="" VerticalAlignment="Top"   Margin="157,39,0,0" Width="622" Height="80"/>
        <Button Content="Save" HorizontalAlignment="Left" VerticalAlignment="Top" Margin="415,179,0,0" Click="Button_Click_1"/>
    </Grid>
</Page>

In order to use FileSavePicker we have to use following namespaces, add those to Mainpage.xaml.cs

using Windows.Storage.Pickers;using Windows.Storage;

Following is the code for FileSavePicker, write the code in Button click event,

            FileSavePicker picker = new FileSavePicker();
            picker.SuggestedStartLocation = PickerLocationId.DocumentsLibrary;
            picker.FileTypeChoices.Add("Plane Text", new List<string>() { ".txt" });
            picker.DefaultFileExtension = ".docx";
            picker.SuggestedFileName = "New Document";
            StorageFile file = await picker.PickSaveFileAsync();
            if (null != file)
            {

                // Application now has read/write access to the saved file                
                await Windows.Storage.FileIO.WriteTextAsync(file, text1.Text);
                MessageDialog msg = new MessageDialog("File Saved Successfully");
                await msg.ShowAsync();
            }
            else
            {
                MessageDialog msg = new MessageDialog("File Was Not Returned");
                await msg.ShowAsync();
            }

In the above code,
  • Created an object of FileSavePicker
  • Suggested start location
  • Added file types the user can save the file as
  • Mentioned default extension if the user does not select a choice explicitly from the dropdown 
  • Suggested file name if the user does not type one in or select a file to replace
  •  Getting the text whatever typed in textbox and saving it to file.
Now, build the application and Run by using F5. Type something in Textbox and click on Save button


It opens a FileSavePicker, 


Give the file name and choose the location of where you want to save your file. Then, click the save button to save the file.


You get the message of saving the file successfully. Go to the location and see the file. This is how FileSavePicker is used.

Hope this is useful.
Thank You.

Tuesday, 19 March 2013

Windows Store App Development Tutorial - Part 11 : FileOpenPicker

FileOpenPicker is an UI element, used to choose and open files. In order to use FileOpenPicker, we have to add "Windows.Storage.Pickers" namespace.

In this sample, I am taking a Button and Image control in the design page, whenever user clicks on Button, it opens FileOpenPicker to select an image from the collection of images which are from the local drive of computer. When the user selects a particular image, in binds that with Image control which is present in design page.

XAML Design of the page is as follows,

 <Image x:Name="image1" HorizontalAlignment="Left" Height="194" Margin="275,112,0,0" VerticalAlignment="Top" Width="200" Stretch="UniformToFill"/>
 <Button Content="Click" HorizontalAlignment="Left" VerticalAlignment="Top" Click="Button_Click_1"/>


Following code is about how to use FileOpenPicker, write the code in button click event,

            FileOpenPicker picker = new FileOpenPicker();
            picker.SuggestedStartLocation = PickerLocationId.PicturesLibrary;
            picker.ViewMode = PickerViewMode.Thumbnail;
            picker.FileTypeFilter.Add(".jpg");
            picker.FileTypeFilter.Add(".png");
            var file = await picker.PickSingleFileAsync();
            var stream = await file.OpenAsync(Windows.Storage.FileAccessMode.Read);

In the above code, 
  • Created an object of FileopenPicker,
  • Suggested start location
  • Assigned view mode as thumbnails
  • Added two file type filters are .jpg, .png
  • Reading complete stream of selected image
Now, we have to bind selected image to the image control which is in design page. For that we are using BitmapImage class. In order to use this class, add the "Windows.UI.Xaml.Media.Imaging" namespace.

            BitmapImage bmp = new BitmapImage();
            bmp.SetSource(stream);
            image1.Source = bmp;


In the above code, I am creating object of BitmapImage class,  setting the source to stream and setting image control source to selected image.

I hope this is useful. Thank You.

Windows Store App Development Tutorial - Part 10 : Image Control

In this tutorial, I am going to tell about Image control in windows store app.

Image control is generally used to show image in the application. There are two ways you can add images to your application,

1. Static - Assign the URI of the image in XAML as shown below,

<Image Name="image1" Source="Assets/Logo.png" HorizontalAlignment="Left" Height="194" Margin="275,112,0,0"   VerticalAlignment="Top" Width="200" Stretch="UniformToFill"/>

2. Dynamic - We can add Images in .cs file as shown below,

image1.Source = new BitmapImage(new Uri("ms-appx:Assets/Logo.png"));

OR

BitmapImage bmp = new BitmapImage();
bmp.UriSource = new Uri(this.BaseUri,"Assets/Logo.png");
imag1.Source = bmp;

I hope this is useful. Thank You.

Thursday, 15 November 2012

Windows Store App Development Tutorial - Part 9 : Handling Files And Folders


Many time we need to access files and folders from our applications. The Windows Store apps SDK provides us Asynchronous APIs to use for this service to query files and folders. You have to be familiar with async await calls in order to get started with this.

Understand the API : 

StorageFolder” is a class of Windows Store SDK present in the Windows.Store namespace and provides us easy access APIs to handle all file and folder operations. The class implements few interfaces named IStorageFolder, IStorageItem, IStorageFolderQueryOperations, IStorageItemProperties to manipulate folders and their contents to provides information about them.

To get the installed location of the current application package, you need to call the Package.Current.InstalledLocation property get the folder handle and store it as StorageFolder reference. This is how you can call it:

StorageFolder installedStorageFolder = Package.Current.InstalledLocation;

Let’s quickly see the API methods present in the Windows.Store.StorageFolder class. Read out the method comments to understand the API calls:

// Creates a new file in the folder or file group.
// When this method completes, it returns the new file as a StorageFile.
public IAsyncOperation<StorageFile> CreateFileAsync(string desiredName);

// Creates a new file in the current folder, and specifies what to do if a file
// with the same name already exists in the current folder.
// When this method completes, it returns the new file as a StorageFile.
public IAsyncOperation<StorageFile> CreateFileAsync(string desiredName,
CreationCollisionOption options);

// Creates a new subfolder inside the current folder.
// When this method completes, it returns the new subfolder as a StorageFolder.
public IAsyncOperation<StorageFolder> CreateFolderAsync(string desiredName);

// Creates a new sub-folder inside the current folder, and specifies what to do
// if a folder with the same name already exists in the current folder.
// When this method completes, it returns the new subfolder as a StorageFolder.
public IAsyncOperation<StorageFolder> CreateFolderAsync(string desiredName,
CreationCollisionOption options);

// Gets a single file from the current folder using the specified file name.
// When this method completes successfully, it returns a StorageFile that
// represents the file.
public IAsyncOperation<StorageFile> GetFileAsync(string name);

// Gets a single sub-folder from the current folder using the specified folder name.
// When this method completes successfully, it returns a StorageFolder that
// represents the sub-folder.
public IAsyncOperation<StorageFolder> GetFolderAsync(string name);

// Gets a single file or sub-folder from the current folder using the name
// of the item. When this method completes successfully, it returns the file or folder.
public IAsyncOperation<IStorageItem> GetItemAsync(string name);

// Gets the top-level files in the current folder.
// When this method completes successfully, it returns a list of the files
// in the folder. Each file in the list is represented by a StorageFile object.
public IAsyncOperation<IReadOnlyList<StorageFile>> GetFilesAsync();

// Gets a list of the top-level sub-folders of the current folder.
// When this method completes successfully, it returns a list of the files.
// Each folder in the list is represented by a StorageFolder.
public IAsyncOperation<IReadOnlyList<StorageFolder>> GetFoldersAsync();

// Gets a list of top-level files and sub-folders inside the current folder.
// When this method completes successfully, it returns a list of the files
// and folders inside the current folder. The items in the
// list are represented by objects of type IStorageItem.
public IAsyncOperation<IReadOnlyList<IStorageItem>> GetItemsAsync();

// Renames the current folder.
// No object or value is returned by this method when it completes.
public IAsyncAction RenameAsync(string desiredName);

// Renames the current folder and specifies what to do if a folder with the
// same name already exists. No object or value is returned by this method
// when it completes.
public IAsyncAction RenameAsync(string desiredName, NameCollisionOption option);

// Deletes the current folder or file group.
// No object or value is returned by this method when it completes.
public IAsyncAction DeleteAsync();

// Deletes the current folder or file group, optionally deleting it permanently.
// No object or value is returned by this method when it completes.
public IAsyncAction DeleteAsync(StorageDeleteOption option);

// When this method completes successfully, it returns a list of the files
// in the folder. Each file in the list is represented by a StorageFile object.
public IAsyncOperation<IReadOnlyList<StorageFile>> GetFilesAsync(CommonFileQuery query,
uint startIndex,
uint maxItemsToRetrieve);

// Gets a list of all files in the current folder and its sub-folders.
// Files are filtered and sorted based on the specified CommonFileQuery.
// When this method completes successfully, it returns a list of the files
// in the folder. Each file in the list is represented by a StorageFile object.
public IAsyncOperation<IReadOnlyList<StorageFile>> GetFilesAsync(CommonFileQuery query);

// Gets an index-based range of StorageFolder objects that represent groups of files
// in the current folder. Files are filtered and grouped based on the specified
// CommonFolderQuery and are included in the range based on the resulting indexes.
// When this method completes successfully, it returns a list of the files.
// Each folder in the list is represented by a StorageFolder.
public IAsyncOperation<IReadOnlyList<StorageFolder>> GetFoldersAsync(CommonFolderQuery query,
uint startIndex,
uint maxItemsToRetrieve);

// Gets a list of StorageFolder objects that represent groups of files in the
// current folder. Files are filtered and grouped based on the specified CommonFolderQuery.
// When this method completes successfully, it returns a list of the files (type IVectorView).
// Each folder in the list is represented by a StorageFolder.
public IAsyncOperation<IReadOnlyList<StorageFolder>> GetFoldersAsync(CommonFolderQuery query);

// Gets a StorageFolder that represents the folder at the specified file-system path.
// When this method completes successfully, it returns a StorageFolder that represents the
// folder.

public static IAsyncOperation<StorageFolder> GetFolderFromPathAsync(string path);

The above API methods will provide you instance towards the StorageFolder asynchronously. When you are calling it from a method, you must have to mark the method as async and the call must be marked as await.

The StorageFolder instance also provides you few information about the file and folder by exposing few properties. You can directly call those properties to grab the information.

Here are the properties that the StorageFolder exposes to the developers:

// Gets the attributes of the current folder.
public FileAttributes Attributes { [MethodImpl] get; }

// Gets the date and time that the current folder was created.
public DateTimeOffset DateCreated { [MethodImpl] get; }

// Gets the name of the current folder.
public string Name { [MethodImpl] get; }

// Gets the full file-system path of the current folder, if the folder has a path.
public string Path { [MethodImpl] get; }

// Gets the user-friendly name of the current folder.
public string DisplayName { [MethodImpl] get; }

// Gets the user-friendly type of the folder or file group.
public string DisplayType { [MethodImpl] get; }

// Gets an identifier for the current folder. This ID is unique for the query result
// or StorageFolder that contains the current folder or file group, and can be used
// to distinguish between items that have the same name.
public string FolderRelativeId { [MethodImpl] get; }

// Gets an object that provides access to the content-related properties
// of the current folder.
public StorageItemContentProperties Properties { [MethodImpl] get; }

You can easily understand the need of each property from the above property level comments mentioned above.

How to Use The API's :

In case you need to create or get an instance of file or folder inside your application’s root folder, you first need an instance of the installed directory which you can grab by calling Package.Current.InstalledLocation as mentioned above. Once you have the instance of the same, you can easily call the above APIs and pass required parameters to do so.

Let me show you how to create and get folders and files easily with the APIs present in Windows.Store.StorageFolder class:

// ways to create new folder
folder.CreateFolderAsync("Demo Folder", CreationCollisionOption.FailIfExists);
folder.CreateFolderAsync("Demo Folder", CreationCollisionOption.GenerateUniqueName);
folder.CreateFolderAsync("Demo Folder", CreationCollisionOption.OpenIfExists);
folder.CreateFolderAsync("Demo Folder", CreationCollisionOption.ReplaceExisting);

// ways to get folder
folder.GetFolderAsync("Demo Folder");

// ways to create new file
folder.CreateFileAsync("Demo File.txt", CreationCollisionOption.OpenIfExists);
folder.CreateFileAsync("Demo File.txt", CreationCollisionOption.GenerateUniqueName);
folder.CreateFileAsync("Demo File.txt", CreationCollisionOption.OpenIfExists);
folder.CreateFileAsync("Demo File.txt", CreationCollisionOption.ReplaceExisting);

// ways to get file
folder.GetFileAsync("Demo File.txt");

// ways to get all files by search queries
folder.GetFilesAsync(CommonFileQuery.DefaultQuery);
folder.GetFilesAsync(CommonFileQuery.OrderByDate);
folder.GetFilesAsync(CommonFileQuery.OrderByMusicProperties);
folder.GetFilesAsync(CommonFileQuery.OrderByName);
folder.GetFilesAsync(CommonFileQuery.OrderBySearchRank);
folder.GetFilesAsync(CommonFileQuery.OrderByTitle);

In case you want to rename current folder handle, just call the API folder.RenameAsync(desiredName) with proper desired name and this will fire the rename operation on it.

The delete operation is also easy on a storage folder instance. You can do so by calling the DeleteAsync() method by passing proper parameters to it. There is an option to chose whether you want to use the default system delete operation or a permanent delete. In case of permanent delete operation, your folder will be deleted permanently without sending it to the recycle bin.

Here is how you can achieve this:

// ways to delete a folder instance
folder.DeleteAsync(StorageDeleteOption.Default);
folder.DeleteAsync(StorageDeleteOption.PermanentDelete);

I hope this is useful. Thank You.